Pro/Engineer February 2003 Tip-of-the-Month
Creating Model Animations That Anyone Can View
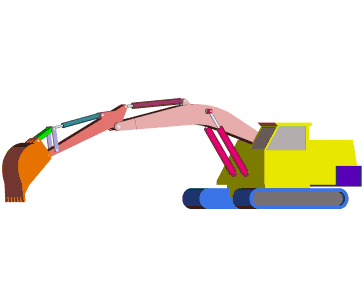
Even if the person has Pro/E, if they don't need all the detail, an image can convey the thought quick and easy (especially with animation) to show how it "works". In Pro/E, if you change the overall model envelope Pro/E will "move" the model with respect to the screen as illustrated in the two screen captures of Figure 2. The trick is to create a feature that defines the model envelope so that changes to the model for animation won't effect its position on the screen. I like to use an extruded surface feature that encompasses the entire model, then put it on a layer and blank it. The surface then defines the model size and does not change as the model is "moved".
Next, move the model to the view you wish to display and save the view (so you can return if needed). View > Saved Views ... Change the background as desired. The Pro/E gradient will cause problems later, so get rid of that. I find the Black on White option is great for sharing images because it's easy to see in an e-mail. (The images above were created this way.) Make your first image. I find the TIF image is the best format, and I usually make the images 4 times bigger than my desired final size. (This doesn't work if you want to show dimensions or other Pro/E text -- or for wire frame.)
Move items in the model as desired and create the pictures. Pull the images into a paint program -- I use Paint Shop Pro -- (free evaluation version available) -- and adjust colors and crop the images as desired. I always re-size the images in the paint program because it antialiases to smooth the edges and give the model a clean appearance. The important part is to use the exact same steps as you manipulate each image that will make up the frames of the animation. The fixed portions of the image must appear not to move when you put it all together (as in Figures 1 & 3). The last step is to create an animated GIF. Use the Animation Wizard or some other program to accomplish this. The outcome can be adjusted as needed. One word of caution: GIF images are restricted to 256 colors. This is plenty to convey ideas, but you need to optimize carefully. If you have the choice, try best fit colors or error diffusion as a good choices in the optimization. | |||||||||||||


 |
 |
 |
| ||
| Design Slide Show | Pro/ENGINEER Tip of the Month | Pro/E Tips Library | Buy the Way | Tech Articles |
| HOME | Who are We? | Our Team/Your Partner | Contact Us | Links & Preferences | Map |
| Copyright © 1996 - SYNTHESIS ENGINEERING SERVICES, INC. : (719) 380-1122 : https://www.SYNTHX.com/ |