Pro/Engineer May 2004 Tip-of-the-Month
A Simple Trick to Make the Required DimensionOne of the nice aspects of Pro/E is the ability to display model information on a drawing -- namely sketcher info. To really harness this, sketches should have dimensions reflecting the intent. Buzz words for this are *Dimensioning Scheme* and *Design Intent*. When the dimensioning scheme reflects the design intent, drawings are quick and easy to create. Sometimes it is not so easy. A simple case is the symmetrical part. For this example, consider a situation where the base features of the part have symmetry about a plane.
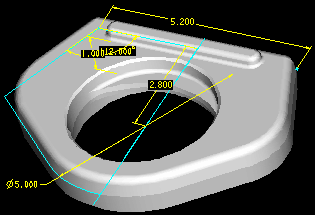
In Figure 1, the sketch for the base feature of the part is highlighted. This sketch is only half, but the 5.200 dimension shows the design intent for the whole thing. How can the dimensioning scheme be created? (In other words . . . . When we think about the part, we think about the size of the whole thing even though it is symmetrical, so the design intent should have dimensions for the whole thing, not half. On the other hand, Sketcher wants to dimension only the sketched half.) Typical methods include:
A better way is to mirror only sketcher construction features then dimension to them. In this case, sketch a point at the end of the line segment, then mirror only the point, not the line. Next, place a dimension, in this case a linear dimension, between the two points. The dimension will appear in Sketcher as shown above, and will also show correctly in the drawing (no diameter symbol). There are also other ways to accomplish this task or to *Trick* Pro/E into the intended dimensioning by creative placement of construction entities like centerlines and construction circles. This is especially true for later versions of Pro where you can Toggle Construction for most Sketcher entities. Think of your High School Geometry class --- and Be creative. |
 |
 |
 |
| ||
| Design Slide Show | Pro/ENGINEER Tip of the Month | Pro/E Tips Library | Buy the Way | Tech Articles |
| HOME | Who are We? | Our Team/Your Partner | Contact Us | Links & Preferences | Map |
| Copyright © 1996 - SYNTHESIS ENGINEERING SERVICES, INC. : (719) 380-1122 : https://www.SYNTHX.com/ |