 |
|
Working with geometry that comes from a different CAD system through a translation protocol such as IGES, DXF or STEP can sometimes be very challenging. In this Tip-of-the-Month we will deal with solid geometry. Perhaps sometime in the future (if you let me know) we can look at 2D import. Figure 1 shows a typical import feature brought into part mode. Usually White lines indicate solid geometry, Magenta lines show surface edges that are attached to their neighbors, and Yellow lines usually indicate surface edges that are not attached. Other colors (like the red here) are usually datum curve features, though some curves may also be white, yellow, or magenta. 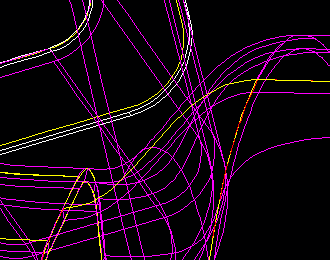 The first thing to do is to understand what you have. This can be done by examining the model using wire frame, and shaded viewing modes. Spin the model, and Zoom in to examine the small details. Look at the layers and turn a few on and off to see what is there. TIP: Be careful with the layers. Items can be on more than one layer. TIP: Create a couple new layers called "IMPORT-CURVES" and "IMPORT-SURFS". Put all the imported curves and surfaces on the respective layers by using SET ITEMS then CURVE or QUILT and PICK MANY to select them. Turn off the layer IMPORT-CURVES and examine just the surfaces by toggling the other layers. Do the opposite for IMPORT-SURFS to examine just the curves. There are now 2 ways to continue work on the part.
The advantage of creating new geometry is that the new features will be parametric, good, sound geometry. Whereas the import geometry may have little problem areas that cannot be easily corrected. Figure 2 shows a completed surface (MAGENTA) but the edges of the geometry are not well defined. These are areas where problems with additional geometry can be expected. 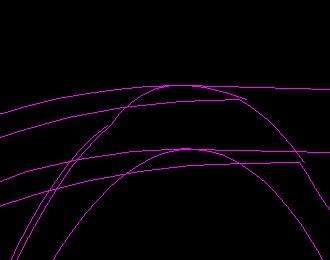 The advantage of manipulating imported geometry is that it will likely be faster, and some features or surfaces may be difficult to replicate. A disadvantage is that as you manipulate it, it will change, and it is hard to tell just how much. If you choose to use the import geometry, use REDEFINE then select the import feature to manipulate it. The first step is to try the easy things, then go to the harder ones as you progress. TIP: Be very careful with changes and the number of changes between saves. ANY CHANGES YOU MAKE TO IMPORT FEATURES WILL BE PERMANENT so take time to back out of the REDEFINE menus and SAVE OFTEN. If you try something that doesn't work the way you thought, just finish with the appropriate DONEs and DONE/RETURNs, then ERASE CURRENT and call it back up. TIP: Prior to manipulating the import geometry, play with the SET UP > ACCURACY value. The greater the number, the easier Pro/E can work with the imported geometry. The smaller the number, the higher the accuracy of the model and the more difficult it is to work with the imported geometry. Be careful with this, because it will also effect later features. In general, if the model is simple, a larger number like 0.002 is fine, but if the model is complicated, you may want a much smaller number like 0.0006. Notice when you change ACCURACY more or less "seams" will change to yellow (unzip). This is important to notice because if you change accuracy later, the import feature may unzip some of the gaps and the later geometry will fail. The simplest thing is to FIX BNDRIES > ZIP GAPS. This will get the small, easy descrepancies. Use AUTO SELECT to see what Pro/E finds, then try adjusting the MAX GAP DIST. Finally, use SEL CHAIN to work with one area at a time. NOTE: With all these procedures, consult the HELP documentation to get more detailed information. The next step is to use FIX BNDRIES > EDIT BNDRY to fix the areas that ZIP GAPS was not able to correct. This is used to move boundaries of surfaces, so be very careful where you select. Figure 3 shows a gap between two surfaces which must be corrected using EDIT BNDRY. Note that the GREEN surface edge must be moved, not the YELLOW surface edge because the arc of the CYAN surface ends at the vertex of the YELLOW surface. If this were done the other way, a GEOM CHECK would occur. This particular surface was corrected by using FIX BNDRIES > EDIT BNDRY then selecting the green surface, SEL CONTOUR > SELECT ALL > MODIFY > MOVE VERTEX. The vertex at the CYAN surface was then moved to the vertex of the yellow surface. Once the move is done, Pro/E shows the new boundary, but will not join the surfaces until you exit back to the main REDEFINE menu. 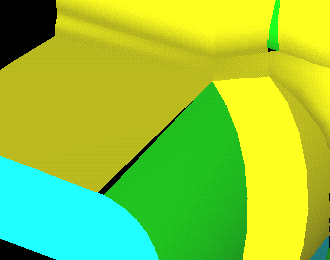 Remember to save after completing a complicated manipulation. There are several other areas of the REDEFINE menu that are very helpful and should be explored. The DELETE, for instance can be used to remove geometry from the import feature. Sometimes there are strange little surfaces off in space in an import feature. These surfaces obviously don't belong, but are there. Don't ignore them. The fact that they are there will affect the part relative accuracy, and Pro/E's ability to deal with changes to the import geometry. They also effect your ability to work with the part with respect to ZOOM, SPIN, and SHADE operations. Delete them. Also, in some cases it is easiest to delete certain surfaces from the feature entirely then reconstruct them later using Pro/Surface. Other times there will be 2 surfaces exactly the same in the same spot. The duplicate surface must be removed (deleted) in order for ZIP GAPS and EDIT BNDRIES functionality to work correctly. Tangency problems can also be addressed in the REDEFINE menus for import geometry. Figure 4 is a good example of weird tangency. The 2 yellow surfaces bend in on themselves as they converge at the point. Use FIX BNDRIES > FIX TANGENCY to correct such problems. The FIX TANGENCY functionality works in much the same way as ZIP GAPS. 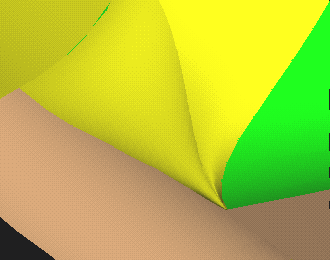 One last word of caution. Changes to the Import feature are permanent, so if you are working along on later geometry and find another place the import feature must be changed, realize that you may have to do a bit of REROUTing and REDEFINing to get back to where you were ... and UNDO CHANGES will not UNDO the REDEFINition of an Import feature. Sometimes UNDO CHANGES will help Pro/E find the past references (for some very weird reason) but even if it helps the model to regenerate, the changes to the import feature will remain. Good luck with all your import features. Just remember to be patient, save often, and explore all the possibilities. There is always a way to make it work. |
 |
 |
 |
 |
 |
 |