|
Using Equations - Part 1
Equations can be incorporated with Pro/E in a number of ways. Over
the next several months we will explore many of their uses. To get
started, this September 1999 and October 1999
Tips will explore using equations in relations - Assembly, Part, and Section
Relations.
To begin, we'll make the assumption you know what RELATIONS are and how to create
them. If you do not, please consult the user guides or on-line help. (One
quick note: In relations, lines starting with /*
are comments. It is a good idea to comment all your relations so you can see
what you did when you come back later. Accordingly, the relations shown in this
Tip of the Month are commented.)
Assembly Relations:
There are 2 main uses for assembly relations: first,
for defining relationships in component placement; and second, for
defining relationships between features of different components.
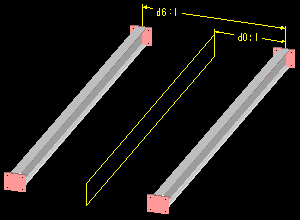
The two beams of Figure 1 demonstrate an example of where relations
can define the association of components to one another. The design
intent is to maintain the two beams symmetrically about a central datum.
This is accomplished by assembling the first beam with an offset from the
central datum, then assembling the second beam with an offset from the
first.
 |
Figure 1
The relation maintaining the beams centrally is:
/* MAKE BEAMS SYMMETRIC ABOUT CENTRAL DATUM
D0:1=D6:1/2
Notice that d6:1, the offset dimension for
the second component, is the driving parameter. Is this good practice
to have a child drive a parent?
In this way it is fine. The relation defines only the value of
the dimension so the first component does not become a child of the second.
Why? Only the value is dependent. In other words, the first
component does not depend on the second for its placement references, only
for the value of the offset. If the second component is removed,
the value remains.
Here is another example of setting components with respect to each other.
The cross members in Figure 2 are a pattern, and the relation equations
define these as being central along the main beams. Can you write
the equations for this? (Answer in the
October 1999 Tip of the Month.)
 |
Figure 2
The second main use of assembly relations is defining relationships
between features of different components. An example is again the cross
member part in Figure 2. The length of the protrusion (cross member)
is controlled by the distance between the main beams. Can you write
this equation?
Another example is shown with the holes of Figure 3.
 |
Figure 3
The holes in one part (Figure 3) are threaded; the holes in the other
part are clearance holes for bolts to pass through. To keep the holes
in line, the second set can be aligned to the first during creation, or
they can be maintained positionally with relations. Also, if we want
the diameters to follow in a meaningful way, we can use a relation.
In this case, the clearance hole is defined as being 1 mm larger than the
thread major diameter. The relation equation controlling this is:
/* MAKE CLEARANCE DIA 1 MM GREATER THAN THREAD DIA
d4:6=d12:2+1
/* WHERE D4:6 IS THE CLEARANCE HOLE DIAMETER
/* WHERE D12:2 IS THE THREAD MAJOR DIAMETER
Explanation: The "d4"
portion of the dimension parameter is the part dimension. The ":2"
portion denotes the assembly member. These numbers are assigned by
Pro/E in much the same sequentially random manner as the dim parameters
and internal ID's.
When relations are used in an assembly,
where are the relations stored? (A trick question perhaps, but we'll
answer it in the October 1999 Tip of the Month.)
Part Relations:
Part relations are very similar to assembly relations. They can
be used to control features or dimensions with respect to each other. A
simple example is the patterned hole set shown in Figures 4A and 4B.
Here the hole positions are dependent on the number of holes required,
and the relation maintains equal spacing around the circle. In Figure
4A there are 6 holes, in Figure 4B it has changed to 11. The equation
maintaining this relationship is:
/* SPACE PATTERNED HOLES EQUALLY AROUND BOLT CIRCLE
D5=360/P0
Explanation: The "p0"
is the pattern number dimension parameter, in this case, 6 or 11.
The equations you create can become as complicated as you wish.
You can include many standard functions including trigonometry functions,
square roots, exponents, etc.. See your help documentation for more
information.
Another nice option with relations is the conditional "IF" statement.
Here is an exercise to try.
Exercise:
Build a UDF (User Defined Feature - see December
1998 for more information) which will automatically size the drilled
hole and chamfer of Figure 3 for whatever thread diameter is defined. In
other words, build a UDF to be placed into new models that will have the
drilled hole, chamfer and the cosmetic thread defined to automatically
update the hole and chamfer to the correct tap drill size when the thread
diameter is modified. You will need to use IF statements because the difference
in diameters is not always the same.
 |
Figure 3 (Repeated)
Sketcher Relations:
Stay tuned, we will explore these in our October 1999
Tip of the Month. See you then. |


