| Variable Section Sweeps require at least 2 trajectories -- 1 to define the path, and 2
to define the orientation of the section as it follows the path. Additional trajectories
may be added to further define how the section will vary from beginning to end.
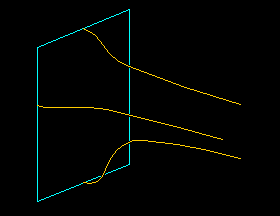
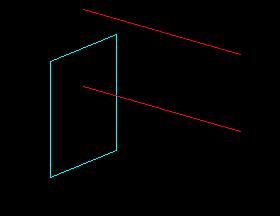
Figure 1 is an example of 3 trajectories and a section to define a new variable
section sweep. By using the Pivot Dir option, the desired protrusion can be
attained, but sometimes the result is not as expected.
TIP:
Control the section using the Normal To Traj option then add a first trajectory to guide
the section as you desire.
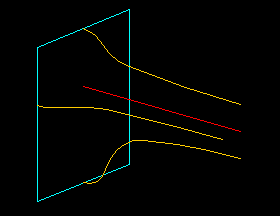
The red curve of Figure 2 shows the first trajectory for our example. It was
sketched "on the fly". The other 3 trajectories were then selected to control the section.
Note: This example uses a straight trajectory sketched "on the fly", but just
about any curve will work.
TIP:
Be sure the first trajectory adequately describes the desired path. The section will
follow this path and vary as it goes. Be sure the path you define will not cause the
section to overlap or fold on itself. Failures and "funny" ripples are often caused by
a poorly placed first trajectory.
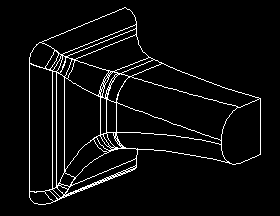
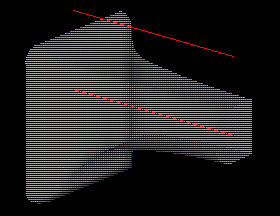
Next, understand the effect of trajectories on your final geometry. If the trajectories
of Figure 2 are created from arcs, the resulting protrusion will have tangent though
curvature discontinuous surfaces. This is seen by the tangent lines appearing on the
solid. The effect of this may be similar to the protrusion of Figure 3, where
rounds have been added to show the compounding effects of additional geometry added later.
Note: Surfaces such as these are not intrinsically bad, however, when they are
small like those of Figure 3, they can cause problems in later geometry, and create
headaches with FEA and CAM.
TIP:
Use composite curves to create continuous surfaces.
To learn more about composite curves please see our Pro/E tip of the Month for February 1998.
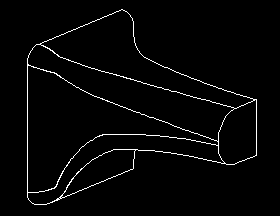
The protrusion of Figure 4 was created using the curves of Figure 2, but
the 3 orange curves were changed to composites. Notice the tangent lines of the sweep are
gone, and the added rounds create single surfaces resulting in "cleaner" geometry.
Another approach to the Variable Section Sweep is control by equation or graph.
Here, the sweep needs only 2 trajectories. The first is the same as above. The second
defines only the orientation of the section so it can simply be parallel as in Figure 5.
TIP:
When controlling a sweep by equation or graph, place the X-trajectory away from the section to
avoid undesired sketcher assumptions.
Section dimensions are then controlled by relation equations or by graph features.
(See Pro/E Help for more information.)
The resulting solid with highlighted trajectories is shown in Figure 6.
(Rounds have been added for consistency with the above pictures.)
Note: The above discussion about using composite curves applies to the use
of graphs also. If multiple entities are used in the graph, the resulting geometry will
have tangency lines.
TIP:
To maximize flexibility, you can mix and match the above techniques -- using trajectories,
equations, and graphs. In this way you can create truly astounding geometry.
|